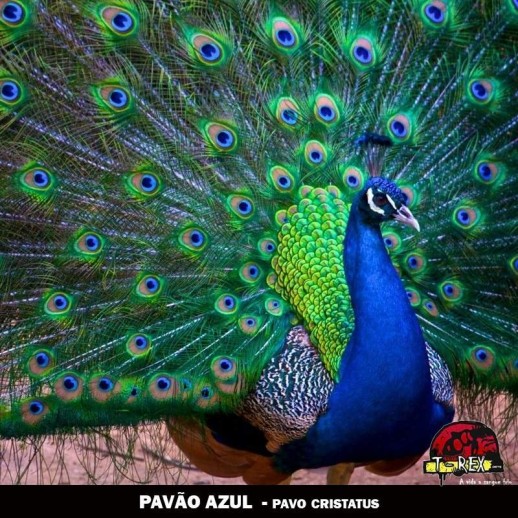
The following is a step-by-step on how I constructed my
vivarium. I hope these pictures will be of help to those
of you thinking of setting up your own. Feel free to
email me if you have any questions or suggestions.
Materials Used
- A length of PVC pipe
- Plastic egg crate (for diffusing flourescent lights)
- Fine nylon mesh
- Zip ties
- Cork bark
- Clay pellets
- Sphagnum moss + my own mix
- Rocks
- Driftwood
The False Bottom
I had decided that I wanted a false bottom. I wanted to
have a water feature and have some good circulation
going on beneath the surface. I am going to keep some
Boraras and so having a submerged filter would be a good
idea.
I'm going to create a slope with the false bottom. Let's
start with the PVC piping. Saw them down to the desired
length. Here, I had three different lengths - 2.5", 2"
and 1.5". Make sure that the water level will be high
enough to keep your filter fully submerged. I also
drilled some holes in the piping so that water will flow
through them and not remain stagnant. (Do not silicone
anything in place until you are satisfied with the
entire construction of the false bottom.)

Next, cut the egg crate to the desired shape. As you can
see, there's an opening for a small pond as well as
another compartment (in the left rear corner) to house
the filter. The top can be opened and this will allow me
to gain access to the filter for future maintenance.

Once I was satisfied with the floorplan, I siliconed
some vertical pieces along the edges of the water area.
This will serve to keep your substrate from falling into
the water area. You'll notice that some of the vertical
pieces are actually slanted to create a sloping bank. I
proceeded to cover everything up with a layer of the
nylon mesh. I used zip ties to hold the mesh in place. I
did not cover up all the sides to the water area as I
wanted the fish to be able to swim inside if they needed
some privacy. I also stuck and covered vertical pieces
at the front. You'll understand why I did this later.

The Background
I used cork bark to create the background. There were
other alternatives, but I really loved the texture and
irregularity of the cork bark. Cut to size and silicone
to the back wall of the tank. Simple as that! I laid the
tank on its back and weighed down the cork bark for the
silicone to dry overnight.

Here's how it looked the following day. I had left the
gap in the left corner to conceal wiring and the piping
for the waterfall feature.

The Waterfall Construction
I couldn't find a suitably sized internal filter, so a
small powerhead would have to do. I made a cover for the
front of the waterfall piping by sticking loose pieces
of cork bark together. A test fit looks good and the
waterfall seems like it just might work.

This powerhead is good for 350L/H and has a switch to
adjust the water flow from small-medium-full. The piping
for the waterfall is actually a part I salvaged from an
old sponge-filter. It's just the right size and has a
right-angled spout for the waterfall. Some filter sponge
there act as filter material and cultivate beneficial
bacteria.

The Substrate
First lay about 1-1.5" of the clay pellets.(
Hidro-Balls
www.zoopets.com.br/loja
) Make sure you wash them in some hot water
before use. I found that they had a lot of clay dust on
them. On top of this, I put down a layer of my own mix.
This contains sphagnum moss and some other horticultural
mix. I prepared this in a bucket with a bit of water to
get everything soggy and easy to handle. Some people
might lay another layer of mesh on top of the clay
pellets to prevent the top substrate from settling
downwards. I opted not to do this as my mix contains
materials which drain water very well, and I didn't mind
if it settled into the pellets. Here you'll see a
clearer shot of the waterfall fixture.

Some tips for laying the substrate. Remember the
vertical pieces of egg crate facing the front of the
tank? If you have sharp eyes, you'll notice I stuffed
some gravel in between them and the glass. This will
help conceal the ugly sight of the PVC piping under the
false bottom. I also put an inch of the substrate mix at
the front, so we don't see the clay pellets. A great tip
I learnt later on was to smear silicone over the
vertical mesh and banks, then stick gravel or dried moss
on them. I couldn't use this tip as I had already filled
it up with water.

Landscaping
I'll be using some pieces of driftwood that I have
laying around. The main feature piece looks like the
trunk and roots of a tree. My friends used to call this
piece "chicken foot". Go ahead and plant everything
before filling it up with water. Pay extra attention to
the edges of the water area. You'll want to totally
carpet it with plants or your substrate will start
floating into your water area when you fill it up.

The Waterfall: Scaping and Testing
I wanted to create a stream from the waterfall to the
water area. I hadn't found the right rocks for it yet,
so here I'm testing the placement and flow with a piece
of plastic and some wood (as banks) to prevent my
substrate from washing into the water area.

A closeup of the waterfall in action. I siliconed a few
pieces of cork bark around the spout to conceal it
better. The pieces below it serve to direct and spread
the water flow. I'll place some moss to grow here and
give it a more natural look.

The flow looks good, so time to create the rock scape
for the base of the waterfall and stream. I used some
granite rocks and played around with the placement, then
siliconed them together after I was satisfied with the
final look. Some moss over the rocks help to conceal the
joints. The stream will look better once a bit of algae
starts growing on the rocks. I might cement the rocks
together if the silicone gives way.

Additional Water Spout
After running the system for a couple hours, I noticed
the right side of the tank wasn't as moist as I wanted.
The big driftwood was drying out. A trickle tap should
be able to provide the amount of moisture needed. A
T-splitter was used to redirect some of the output from
the waterfall to the trickle tap.

I ran some small rubber tubing along the back wall to
protrude out behind the driftwood.

A spout with adjustable flow works well here, as I'll be
able to fine tune the amount of water I need. Right now,
it trickles like a leaky tap, keeping the moss and wood
damp. The moss should grow and hide the tap from view.

Top Cover
Almost there! To prevent too much moisture from
evaporating and drying out the plants, we need a cover
to keep the humidity in. I had previously used plastic
food wrap as a temporary measure until I finally found
some transparent acrylic in a storeroom.
The tank had a small inner ledge which would hold the
acrylic in place, so all I had to do was measure and
cut. I decided to split it into 2 pieces, and drilled
holes mainly above the front panel. This ensures that
the front glass would remain clear and not fog up and
spoil my viewing pleasure. I also added knobs for easy
handling.

Finished Vivarium!
A couple more plants will be added and some things
shifted around, but all the hard work is done! For
lighting, I use a 24W compact flourescent.
